The intention here is to cover some simple basics with getting CommunityToolkit.Mvvm going using dependency injection. There are a ton of of tutorials that go much further in-depth with CommunityToolkit including Microsoft’s own introduction.
But as a basic intro let’s start with what CommunityToolkit.Mvvm is. It is a package that integrates the MVVM pattern into your application. The basic nuget package is used in WPF but there are further packages for WinUI, UWP and Maui that include controls specific to those environments. It makes it absurdly easy to use MVVM, taking a lot of the barriers out of the way. It works as well as it can in .NET framework but really shines in .NET Core.
.NET 5 added source code generators. This allows CommunityToolkit to analyze your code and generate all the back-end properties and classes for making MVVM easy. CommunityToolkit is .NET standard 2.0 compliant so it will work in your .NET framework applications but it needs that source code generation in .NET 5 to really explode in features.
Start by adding the package:
dotnet add package CommunityToolkit.MvvmAnd if you’re doing basic out-of-the-box WPF that’s the only package you need.
Create your MainWindowViewModel and add it to the CreateHostBuilder in your App.xaml.cs for DI.
services.AddSingleton<MainWindowViewModel>();Next are two things you need to get into the habit of as you work with the CommunityToolkit. First, all view models must be partial classes and extend ObservableObject. This is how the source code generator from CommununityToolkit knows that this should be a view model and to scan it for the attributes I’ll mention below. It will also create it’s own object that includes the needed properties to wire up MVVM. That’s why the partial is needed, so the compiler knows to combine the view model CommunityToolkit created and this view model.
public partial class MainWindowViewModel : ObservableObjectSecond, any properties you want to be able to bind should be private and have an ObservableProperty attribute above them so the source code generator knows to build those as properties for your class that can be bound to.
    [ObservableProperty]
    private string chatText = "";
The last thing here is to add the view model to the constructor of your MainWindow. Since we set everything up with DI, when the view is constructed via host.services the system knows to grab the instance of MainWindowViewModel from services and use that on the constructor.
    public MainWindow(MainWindowViewModel mainWindowViewModel)
    {
        DataContext = mainWindowViewModel;
        InitializeComponent();
    }
It’s import to remember that if you’re in .NET Core >= 5, that it will create all the back-end code for you. Because it’s doing that, it knows that it should uppercase your property. So for the “chatText” above, when we bind it, we’ll use “ChatText”. Visual Studio will usually see that property right away but I’ve found that Visual Studio Code sometimes needs a build to see the new properties.
Next, while it’s not strictly necessary, I would start by adding a d:DataContext property to the Window element so Visual Studio knows what I’m binding to.
<Window
    x:Class="Chatter.MainWindow"
    xmlns="http://schemas.microsoft.com/winfx/2006/xaml/presentation"
    xmlns:x="http://schemas.microsoft.com/winfx/2006/xaml"
    xmlns:d="http://schemas.microsoft.com/expression/blend/2008"
    xmlns:local="clr-namespace:Chatter"
    xmlns:materialDesign="http://materialdesigninxaml.net/winfx/xaml/themes"
    xmlns:mc="http://schemas.openxmlformats.org/markup-compatibility/2006"
    Title="Chatter Chat"
    Width="800"
    Height="450"
    d:DataContext="{d:DesignInstance local:MainWindowViewModel}"
    KeyUp="Window_KeyUp"
    PreviewMouseWheel="Window_PreviewMouseWheel"
    mc:Ignorable="d">
It helps out Intellisense so it I can see properties in the view model. Remember, in MVVM it’s okay for our view to know about our view model but not for our view model to know about our view.
And finally do the bind:
            <TextBox
                Grid.Column="0"
                Margin="5,0,5,5"
                materialDesign:HintAssist.Hint="Chat Message"
                Text="{Binding ChatText, UpdateSourceTrigger=PropertyChanged}" />
So let’s play with this. If you’re looking in the attached solution you’ll see the following property:
    [ObservableProperty]
    [NotifyPropertyChangedFor(nameof(BackgroundBrush))]
    Color background = Colors.White;

    public Brush BackgroundBrush
    {
        get => new SolidColorBrush(Background);
    }
Background is a property that is bound to a color picker control from MaterialDesignThemes and stores the color as a Color. But I want to be able to set the background of a corresponding control to the color chosen and to do that I need a brush.
What this is doing is I’m telling CommunityToolkit, when Background changes, also fire a NotifyPropertyChanged for BackgroundBrush so any control bound to it will update. You can see this in action in the following code:
            <Expander
                x:Name="colorPickerExpanderForeground"
                Grid.Column="0"
                Background="{Binding BackgroundBrush}"
                Foreground="{Binding ForegroundBrush}"
                Header="Foreground"
                IsExpanded="{Binding IsColorPickerExpanded}">
                <materialDesign:ColorPicker
                    MinHeight="100"
                    Margin="5"
                    Color="{Binding Foreground}" />
            </Expander>
            <Expander
                x:Name="colorPickerExpanderBackground"
                Grid.Column="1"
                Background="{Binding BackgroundBrush}"
                Foreground="{Binding ForegroundBrush}"
                Header="Background"
                IsExpanded="{Binding IsColorPickerExpanded}">
                <materialDesign:ColorPicker
                    MinHeight="100"
                    Margin="5"
                    Color="{Binding Background}" />
            </Expander>
When a color is chosen from the Foreground color picker it sets not only the color but tells the expander that it needs to update it’s foreground brush. This works the same for the Background color picker. This provides nice feedback to the user on exactly what the final outcome of the colors will look like.
This is what it looks like in action:
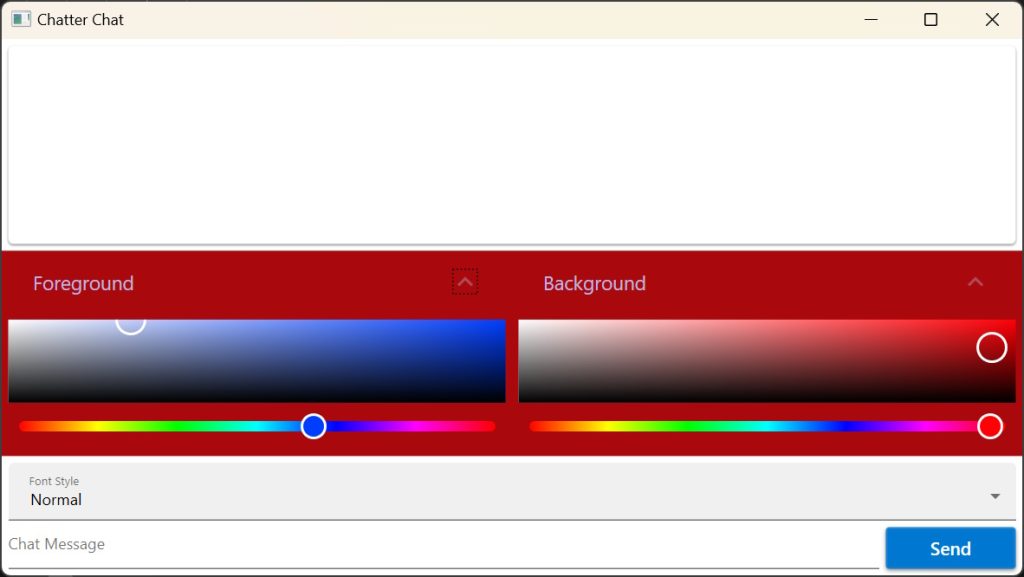
It is really cool to see the foreground and background of the expanders update as you drag around the color picker colors.
Up next we’ll cover the IMessenger interface in CommunityToolkit and send some chats to ourself.
Thanks,
Brian
One thought on “A light tutorial of CommunityToolkit.Mvvm and Dependency Injection”