In the previous post I wrote a brief intro to MVVM along with some pros and cons. Next up in this series is an explanation of the layout of the solution and some of the rudimentary framework. Don’t forget you can download all the code here.

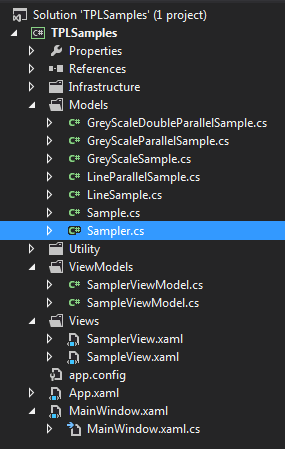
In the image above you can see the layout of the solution with Views, ViewModels and Models. MainWindow.xaml has our SamplerView.xaml. SamplerView.xaml has as it’s DataContext a SamplerViewModel.
<UserControl.DataContext>
	<ViewModels:SamplerViewModel />
</UserControl.DataContext>
Looking at the constructor of the SamplerViewModel:
public SamplerViewModel()
{
	Samples = new ObservableCollection();
	Sampler = new Sampler();
	Sampler.Samples.Add(new LineSample());
	Sampler.Samples.Add(new LineParallelSample());
	Sampler.Samples.Add(new GreyScaleSample());
	Sampler.Samples.Add(new GreyScaleParallelSample());
	Sampler.Samples.Add(new GreyScaleDoubleParallelSample());
	ResetSampler();
}

private void ResetSampler()
{
	this.Samples.Clear();
	foreach (var sample in Sampler.Samples)
	{
		this.Samples.Add(CreateSampleViewModel(sample));
	}
}

private SampleViewModel CreateSampleViewModel(Sample sample)
{
	SampleViewModel vm = SamplerViewModelFactory.GetViewModelForSample(sample);
	return vm;
}- we set up our observable collection for our sample view models
- construct our Sampler model
- construct all our samples
- using a Factory pattern get the view model for each of our samples
Now let’s take a step back to the SamplerView.xaml. If you look at the code you’ll see there is a lot going on in the xaml I’m not going to cover here. There are, however, two very important parts to the SamplerView.xaml that must be covered. The first is the DataContext mentioned above that creates a SamplerViewModel. The other is the ItemsControl that binds to the Samples collection.
<ItemsControl Grid.Row="1" IsTabStop="False" ItemsSource="{Binding Samples}">
	<ItemsControl.ItemsPanel>
		<ItemsPanelTemplate>
			<WrapPanel Orientation="Horizontal" IsItemsHost="True" Utility:MarginUtilities.Margin="5" />
		</ItemsPanelTemplate>
	</ItemsControl.ItemsPanel>
	<ItemsControl.ItemTemplate>
		<DataTemplate>
			<Views:SampleView DataContext="{Binding}" />
		</DataTemplate>
	</ItemsControl.ItemTemplate>
</ItemsControl>
When you set the data context in WPF you are exposing that object and it’s properties to binding within that control. In the code above you can see we are binding the ItemsControl to the Samples property of our view model which is an observable collection that contains all of the view models for the samples. In addition to that we are setting the ItemTemplate of the ItemsControl to a view entitled “SampleView” basically saying, “Anything we bind to will use the SampleView as our item” (note that this will be changed later to allow for more SampleView types). It’s this initial setup that can be rather complex but once the framework is in place adding new models (in this case samples) to the application is pretty straight forward.
So let’s walk through from the beginning how we get all of our samples into the application:
- MainWindow.xaml contains a user control, “SamplerView”
- SamplerView.xaml has as its data context a “SamplerViewModel”
- SamplerViewModel.cs has a “Sampler” model that we add all the samples to
- SamplerViewModel.cs has a list of “SampleViewModel”, called “Samples” with a factory that maps sample models to sample model views
- SamplerViewModel.Samples binds to the ItemsControl in “SamplerView”
- SamplerView.xaml ItemsControl has an ItemTemplate that maps those samples to “SampleView”
You’ll notice that I add all the samples to the Sampler model in the SamplerViewModel and not in the Sampler model constructor. Why do I do this? It’s really just a matter of making it easier to have a single place to go to for adding samples to the application. I’d like to keep to the SamplerViewModel as much as possible since that contains the Factory for mapping those samples to their respective view models.
In the next post I’ll go over the SampleView, SampleViewModel and the base Sample class all the samples extend from.
Thanks,
Brian

7 thoughts on “The Task Parallel Library Sampler – Part Two: The MVVM solution structure and basic framework”