In the last post I added IMessenger into Blazor so it’s accessible via dependency injection. But what do I do with it and how do I use it? That’s what we’ll cover today by starting with the different code blocks in the razor page and then walking through the html and JavaScript.
As always, all code is available via the GitHub project.
In the Chatter.razor, after defining the page attribute I want to tell the server the render mode and what interfaces I want to implement. There are two specific interfaces we need to implement. The first is the IRecipient interface so that IMessenger knows that we want to capture the WriteToChatMessage. This is exactly as it is done in the WPF application. The second is that we want to implement IDisposable so that we can disable our chatter plugin and unregister the IMessenger.
@* we want prerender false so OnInitalize isn't called twice
   This can be mitigated by persisting state between prerender and render but that's
   outside of the scope of this.
   see:  https://learn.microsoft.com/en-us/aspnet/core/blazor/components/prerender?view=aspnetcore-8.0#persist-prerendered-state
*@
@rendermode @(new InteractiveServerRenderMode(prerender:false))

@implements IRecipient<WriteToChatMessage>
@implements IDisposable
I’m being very specific here in that when I define the render mode I only want the page to be initialized once. The server will attempt to render the page in a pre-render step so that portions of non-dynamic code are already built and ready. But for me this is a problem as it means that the OnInitialized is called twice, once in prerender and then again in render. There is also another override, OnParametersSet that ends up being called twice, but I’m not using that here as no parameters are being utilized. As commented in the code there is a work-around Microsoft has provided but it’s a bit of a pain to use and outside of the scope of this post.
Below that are the two implements declarations for IRecipient<WriteToChatMessage> and IDisposable previously mentioned. In code I’ll show how those are utilized.
In the actual code block, it starts with all the variables and parameters I’ll need to implement this page.
[Inject] IJSRuntime JSRuntime { get; set; }
[Inject] protected IMessenger Messenger { get; set; }

private List<ChatHandler> chatPlugins = new();
private ChatHandler chatHandler = null;

//old school get/set but we need to capture the set to handle the handler
//since bind takes over the @onchanged we can't use that when the value is changed and capture
//the change to the index both at the same time.  So just do it in the set
private int chatHandlerIndex = 0;
private int ChatHandlerIndex
{
    get => chatHandlerIndex;
    set
    {
        if (value != chatHandlerIndex)
        {
            chatHandlerIndex = value;
            SetChatHandler();
        }
    }
}

private string chatText = "";
private string alias = "";

private List<ChatItem> chats = new();
The JSRuntime and Messenger are injected via DI. chatPlugins is the list of ChatHandler plug-ins that will be loaded in OnIntialized and chatHandler is the selected ChatHandler plug-in.
The list of ChatHandler plug-ins will be shown to the user with the html select where each option is a ChatHandler plug-in. But it gets a bit tough to manage the @onchange event on the select since we can’t have both an onchange event and bind to the selected plug-in index. If I were to try both @bind and @onchange I’ll get the error:
RZ10008 The attribute 'onchange' is used two or more times for this element. Attributes must be unique (case-insensitive). The attribute 'onchange' is used by the '@bind' directive attribute. To work around this I don’t bind the index of the selected chatHandler plug-in to a variable but to a parameter instead. This allows me call SetChatHandler(), effectively working like an @onchanged. Finally the last three are the text that will be sent as a chat message, the alias the user will use and finally the list of chats received.
    protected override void OnInitialized()
    {
        Messenger.RegisterAll(this);

        alias = "Blazor " + Guid.NewGuid().ToString();

        var baseDir = AppDomain.CurrentDomain.BaseDirectory;
        var pluginPath = Path.Combine(baseDir, "Plugins");
        var plugins = PluginManager.LoadPlugins<ChatHandler>(pluginPath, Messenger);
        chatPlugins.AddRange(plugins);
        if (chatPlugins.Count > 0)
        {
            chatHandler = chatPlugins[0];
            chatHandler.Activate();
        }
    }

    private void SetChatHandler()
    {
        chatHandler.Deactivate();
        chatHandler = chatPlugins[chatHandlerIndex];
        chatHandler.Activate();
    }
The OnInitialized should look similar to the MainWindowViewModel constructor and initializer from the WPF project. That’s because what we need to do here is virtually identical to what I did in the view model, that is initializing variables and parameters and loading the plug-ins. The advantage with loading the plug-ins via a manager helper is that I don’t care what the destination is, just the source and what to load. This means I can call the PluginManager from any type of code.
The SetChatHandler, called when setting the selected index of available plug-ins, works just like the OnChatHandlerChanging method in the view model of the WPF project. That is deactivate the old plug-in and activate the new one.
   private async void SendChat()
   {
       if (string.IsNullOrEmpty(chatText)) return;
       var successful = await chatHandler.SendChatAsync(new WriteToChatMessage(alias, chatText, "White", "Black", "Normal"));
       if (successful)
       {
           chatText = "";
           StateHasChanged();
           return;
       }

       //if the message failed to send just write straight to the chat
       Receive(new WriteToChatMessage(alias, $"FAILED TO SEND MESSAGE: {chatText}", "White", "Black", "Normal"));
   }
The SendChat() is almost copy/paste from the view model with a few differences. First I’m using variables instead of parameters for the alias and chatText. Next I send the foreground and background colors and the font style with fixed values since I didn’t want to integrate a picker for these. But the important difference is that StateHasChanged() call. I have to tell the server that something in the html has changed, in this case the text value of the chat message to send, so it knows to render that as fresh html.
public void Receive(WriteToChatMessage message)
{
    var time = DateTime.Now.ToString("MM/dd/yy HH:mm:ss.fff zzz");
    var alias = string.IsNullOrEmpty(message.alias) ? "Unknown" : message.alias;
    var timeStampMessage = $"{alias} [{time}] {message.message}";

    //strip transparency as it comes in as FF
    var background = message.background?.Replace("#FF", "#");
    var foreground = message.foreground?.Replace("#FF", "#");

    //the receive is called on a different thread than the dispatcher thread
    //so invoke the dispatcher thread to render the state changed
    _ = InvokeAsync(() =>
    {
        chats.Add(new ChatItem(timeStampMessage, background, foreground, message.fontStyle));
        StateHasChanged();
        JSRuntime.InvokeVoidAsync("scrollElementToBottom", "inputGroup-chat");
    });
}

public void Dispose()
{
    chatHandler?.Deactivate();
    Messenger?.UnregisterAll(this);
}
Like SendChat(), this is almost copy/paste from the view model of WPF. This must be added as the required method for the Messenger implementation of IRecipient<WriteToChatMessage>. I do have to strip transparency from the colors coming in as they are inverted in html hex colors. What’s really interesting here is that I also have to invoke the add to the chats list in the Dispatcher thread, just like in WPF. I let the server know something in the html has changed and invoke a JavaScript method to force the div that contains the chat messages to scroll to the bottom. And finally I dispose of whatever needs to be cleaned up when the page is disposed.
In the HTML I start with the select (i.e. combobox) for displaying the plug-ins.
<div class="input-group">
    <div class="input-group-prepend col-3">
        <span class="input-group-text" id="inputGroup-sizing-default">Chat Handler</span>
    </div>
    <select class="form-select" @bind="ChatHandlerIndex" aria-label="plugin select">
        @for (int i = 0; i < chatPlugins.Count; i++)
        {
            var valueChoice = chatPlugins[i];
            <option value="@i">@valueChoice.Name</option>
        }
    </select>
</div>
I create a select input and just iterate in a for loop the plug-ins. I grab the plug-in and set the index from i and set the text for the plugin from the name of the plug-in. I also bind the selected index to the ChatHandlerIndex parameters. This allows me to actually assign the plug-in from the Set method of ChatHandlerIndex and call SetChatHandler().
<div class="input-group" id="inputGroup-chat" style="height: 200px; overflow: auto">
    <div class="input-group-prepend col-3">
        <span class="input-group-text" id="inputGroup-sizing-default">Chat</span>
    </div>
    <ul>
        @foreach (var chat in chats)
        {
            <li style="color:@chat.Foreground; background-color:@chat.Background; font-style:@chat.FontStyle">@chat.Text</li>
        }
    </ul>
</div>
This is the block for writing the received chat messages. The id on the div that holds the unordered list is important because I’ll use it later to force the div to scroll to the bottom each time a new message comes in. Other than that I render a list item for each chat, setting the style to the same values that came in from the WriteToChatMessage.
<div class="input-group">
    <div class="input-group-prepend col-3">
        <span class="input-group-text" id="inputGroup-sizing-default">Alias</span>
    </div>
    <input type="text" class="form-control" @bind="alias" aria-describedby="inputGroup-sizing-default" />
</div>

<div class="input-group">
    <div class="input-group-prepend col-3">
        <span class="input-group-text" id="inputGroup-sizing-default">Message</span>
    </div>
    <input type="text" class="form-control" @bind="chatText" aria-describedby="inputGroup-sizing-default" />
</div>

<button class="btn btn-primary" @onclick="SendChat">Send</button>

<script>
    window.scrollElementToBottom = (elementId) => {
        var elementToScroll = document.getElementById(elementId);
        elementToScroll.scrollTop = elementToScroll.scrollHeight;
    };
</script>
Finally is the last bits of html. The alias and chat text are pretty standard, just binding those values to variables. What’s of interest is the JavaScript I have here. I wrote a basic JavaScript method that forces the element id passed in to scroll to the bottom by setting the top of the scroll bar to the height of the element. As shown previously I use the JSRuntime that was injected to invoke this after the chats list has been updated. This way the chat list is always scrolled to the bottom when a new message is added.
And that’s it for Blazor integration. The import bits from this and the last post are adding the IMessenger into the builder.Services in the Program.cs, injecting it into the razor page and implementing the IRecipient interface to receive the messages.
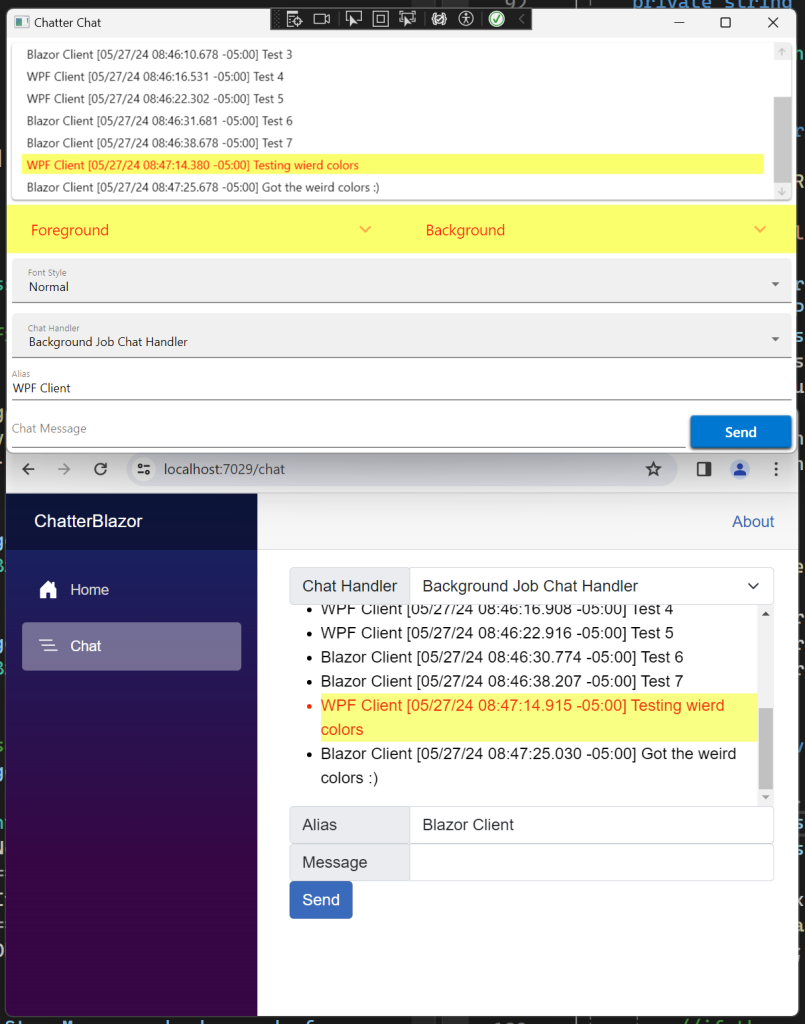
Here is a sample of what it looks like with it all working:
Up next is the next obvious step 😉 adding and integrating the IMessenger to a Maui client.
Thanks,
Brian
One thought on “Integrating IMessenger in Blazor”